
Taking a Great Photograph ~
7 Essential Tips can help you take pictures that are in focus and look great, and it’s not hard to do.
I have been taking photographs my entire life, and used to even develop my own black and white film. But with digital photography taking a great photo is so much easier!
These seven essential tips are important in order to take great photographs, and it doesn’t take much effort to use them. Practice using these tips and they become a great habit. Then, when you want to print your pictures you won’t have to hire someone to do much editing, which isn’t always able to totally correct a poor photograph. After all, a photo is being in the moment, and if you miss the shot, you can rarely have a chance to take that same great picture again.
Photography is like our memory’s external hard drive! When there was a hurricane coming through where I lived, I grabbed my photo books and double wrapped them in plastic bags. Of course I grabbed my kids as well (LOL)! Those were the olden days when you had paper photos and negatives (which you rarely saved). Now the majority of photography is digital and you’d just have to grab a disc, or your computer, unless you have your pictures stored in the cloud. Even though it’s so much cheaper to take pictures now, you still want to capture the best image you can! These tips apply to actual cameras as well as phone cameras.
Here are 7 essential tips to taking the best photograph.
1. Consider how much of the person you want to include in the photo.
Standing too far back will make their face (the important part) very small. Coming in very close can make keeping the camera (or phone) very still so you don’t giggle it and get the picture out of focus. It can also exaggerate parts of the face, depending on the camera settings.
2. Look around to make sure that the background is good
Sometimes people take photos and it seems like a branch or object is sticking out of someone’s head. I remember a picture my mother took of my father on the honeymoon in Washington DC. He was standing DIRECTLY in front of the monument, and it made it look as though the pointy Washington Monument was coming out of my father’s head! Pretty funny!
I had another person submit of a photograph of his beloved aunt standing right next to the garbage can in her kitchen. Not a pretty site! Thankfully, I was able to make it disappear with the magic of photoshop.
3. Brace you arms against your side to keep your phone or camera steady
Moving the camera or phone even slightly, especially when in a darker setting will result in the picture being out of focus. If you can’t find something to lean against, bracing your arms against your sides will help stabilize the picture and keep it in sharp focus. Even better is if you have a tripod and a release cable (really for professionals) that snaps the photo, so pushing the button doesn’t move the camera.
There are some terrific devices now that keep the camera or phone stabilized- but they cost a ton of money. But there are some great little tripods that can set your camera to take great, in focus pictures.
4. Make sure there’s good lighting on your subject.
When you think about it, you are taking a picture of LIGHT. Observe to see where the light is coming in. You know how hard it is to see out of your car windshield when the sun is directly in your eyes, and you have to try to block it out to see what’s in front of you and not crash into the car in front of you? It’s the same thing with taking a photograph. If the light coming in is too bright the picture will be overexposed. Also, taking the picture in the best lighting adjusts the automatic settings in your phone or camera so you can get a better, sharper picture.
5. Don’t take a photo with bright light behind people
When you take a picture with a bright light behind your subject, your automatic setting on your camera doesn’t know what to do! The camera doesn’t want to overexpose the light, so it adjusts for the bright light, and your subject will be very dark. It can make them appear as a silhouette, and the background will be overexposed. No good.
6. Conversely, don’t take a picture with the sun shining in someone’s eyes.
First of all, if you take a picture with the sun directly pointed at your subject, you’ll get a lot of pictures of people with their eyes closed and people blinking! And secondly, you get harsh shadows from the nose and around the eyes. People are very unhappy with the results and will ask you to trash the picture!
PS: TAKE OFF SUNGLASSES! People want to see your eyes!
7. Take a picture where it’s bright, but in what’s known as “uniform shade”.
Don’t take a picture under a tree where you have lots of shadows and light coming through, and you’ll see “spots” from leaves that are darker around brighter spots where the sun shines through. Find a place where the shade is the same- but it’s still bright- like the shade of a building, where the building behind is the same brightness as your subjects.
Check your camera or phone’s setting
Pictures taken with your phone can be great or a problem. If it’s a selfie that you’re taking with the back of your phone, the resolution is great to look at it on your phone or computer, but not for printing. When I ask people to send me their photo in “full resolution” that means a picture where there are LOTS of pixels, which are necessary to make a clean, sharp print. If a picture is only 72dpi (like on a computer screen) when you go to print it, the photo will look like a comic book picture with dots. It can be enlarged, but only slightly, and it will never be as crisp a picture as you’d like.
iPhones are supposed to be set to take the highest resolution pictures, but I’ve seen cases where the setting is off. Make sure to check this BEFORE you start taking pictures and then realize this is a problem. Make sure when you take a picture on your camera or phone that you have the resolution set for the highest quality.
Photo for Printing
I hope you have a photo you love and want to use it in your calligraphy order. But not every photo will work out well. In order to get a sharp, in focus print your photograph must be the right size. That’s called “resolution”.
When you send me your photograph I ask you to send it in “full resolution”. When you take a photograph using your phone the resolution of pixels is generally defaulted at 72 dpi. That means “dots per inch” for printing. It’s perfect for viewing on your tiny phone view or even on a computer screen.

But in order to take that photograph and print it with sharp focus the resolution needs to be at least 240 dpi. Even better is 300 dpi – or ppi (pixels per inch). Otherwise, enlarging a 72 dpi photo would look like a comic book cartoon in a poster. Pixels are little squares that make up the digital photograph. This Andy Warhol art shows only the pixels in the woman’s face, but in actuality all the colors and shapes would be pixelated as well in an enlarged photograph with low resolution.
Unless you are going to have your photos printed you probably don’t need to bother with this information. But for your calligraphy art piece I will need an “actual size” or at least “large” setting in the photos you send to me.
If I’ve totally confused you with asking you to send me your photo in actual size, here’s a short article that explains how to send your photos to me. https://www.nytimes.com/2018/01/16/technology/personaltech/high-resolution-photos-email.html
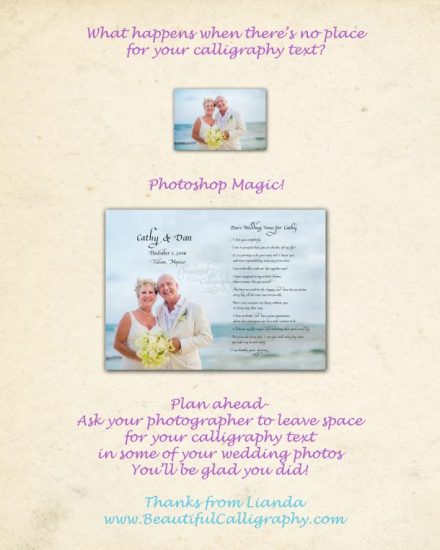
Boxed Photo Vs. Superimposed Calligraphy on photo
Of course, even though you are sending a high-resolution photo, that doesn’t mean I’ll be able to superimpose the calligraphy text directly on the photo. If there’s no place for the text your picture will have to be boxed. (link)
Sometimes even if you have a great photograph there’s no place for me to put your calligraphy text. In that case I’d have to box the picture separately from the photo. But if you want me to be able to superimpose calligraphy on the photo, you have to plan and leave a place that’s not too “busy” with detail.

I can also make your photo stand out by superimposing it on another beautiful background that gives the picture real depth and makes it even more beautiful!

Think before you shoot
Sure, it’s easy to press the button, but if you put a bit of thought into your pictures, you’ll be a lot happier with the results. And, as your calligrapher who wants to use your pictures, it will cost you less money if I can use your picture “as is” without me having to use Photoshop Magic to remove objects, add more space for the lettering, adjust exposure or remove photo bombs!

If Worse comes to Worse
I think the saddest thing was a job where the couple’s wedding photos were all destroyed in a fire. Only one picture remained of the wedding bouquet. And unfortunately, that too was out of focus and damaged. I knew it wouldn’t look nice with the calligraphy. That’s a place where Photoshop Magic really works. I made the out of focus picture look more like a painting, and that solved the problem.
Check the Photo after you take it to see if it’s in focus
Look at the picture on your phone or camera and enlarge it to see if it’s in focus right after you take it. You still have the opportunity to retake the picture. Have a critical eye right then and there, otherwise, no one will be able to make it a better focus when you submit it for printing.
I hope these essential tips will help you take the best photographs possible. And one final tip: If you want to add calligraphy text to your photograph, leave space on the side of the people where’s there’s not a lot of detail so I can have a place to put your words. The only other option is to box your photo and write the text on the side, instead of superimposing it directly on the photograph. But both can look great – especially when you have a great picture using these tips.
Candid vs. Posed Photographs
One final suggestion. When you are taking pictures of people try to take the picture when they're not looking at you or the camera! That's when you get the best expressions. Especially for a couple, isn't it nice when they're looking at each other instead of posing for a photograph? Those are my favorite pictures.
It's not easy to capture, but since photograph is digital you can take LOADS of pictures and just discard the ones that aren't great!
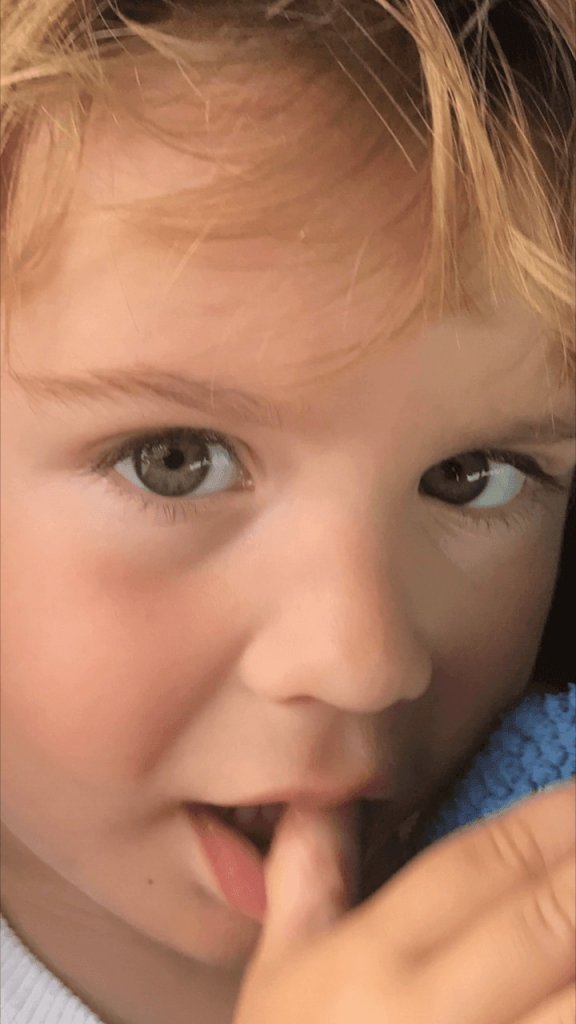
Here are some candid pictures that really bring out the personality of the people.


Strike a Pose for great photos
This article gives examples of ways to make your photographs and even selfies more interesting. Along with my suggestions above, you'll have terrific photographs to combine with calligraphy. Do check it out!